Several stores in one company
A company in Invdash can have several stores, for example one per market, or a real shop and a test shop. The stores can be on different platforms. You work in one store at a time, and the active store decides what the pages show.
Add a store
Only owners and admins can manage stores.
- Open Settings › Integration › Stores and click Add store.
- Choose the platform and fill in the details. The steps differ between platforms:
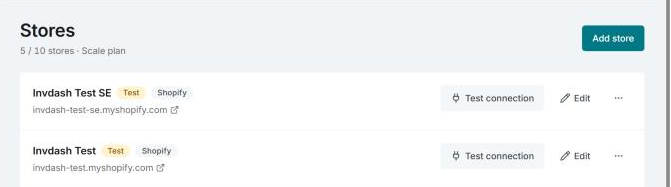
Under the Stores heading you see how many stores you have and how many the plan holds. Once the limit is reached, Add store can't be clicked and the page shows the Upgrade plan link. Read more in Plans and billing.
The platform is chosen when the store is added and can't be changed afterwards.
Switch the active store
The active store's name is in the top bar. Click the name to open the list of stores and choose the one you want to work in. The page you're on reloads with that store's orders, products and settings.
- Invdash remembers your choice. Each user has their own active store.
- If you haven't chosen a store, the oldest store you have access to that isn't paused is used.
- At the bottom of the list is Manage stores, which leads to the Stores page. It's shown to owners and admins.
Who sees which stores
Owners and admins see all of the company's stores. Other members see only the stores they've been given access to. The stores are chosen when the person is invited, see Users and roles.
Per store or per company
Most of what you work with belongs to a store, and is shown for the active store:
- Products, stock, orders, customers, pick lists, shipments and returns.
- Shipment templates: each store has its own templates and its own default template.
- Delivery methods and the checkout's delivery options.
- The return portal.
- Stock levels and stock alerts, see Stock levels and alerts.
- Payment gateways: a payment account is connected to one store.
- Sync, webhooks and plugin.
This is shared by the whole company:
- Shipping agreements with carriers.
- Boxes, the address book and printers.
- Pick settings.
- Users and roles, company information and plan and billing.
When you've added another store: switch to it in the top bar and go through shipment templates, delivery methods, the return portal and payment gateways. They don't come along from the first store.
Test stores
Tick Test store when you add or edit a store that isn't your real shop. The store then gets the Test badge on the Stores page, in the list of stores and beside the store's name in the top bar, so test data isn't mistaken for real orders.
Pause a store
Open More actions (the three-dot button) on the store's row and choose Pause sync. You can also untick Sync enabled when you edit the store.
A paused store isn't synced, and events the shop sends are rejected. What's already in Invdash stays. Click Resume sync on the store's row to start again.
Remove a store
Open More actions on the store's row and choose Delete store.
The store's synced products, orders and customers are removed from Invdash. The shop itself, at WooCommerce, Shopify or Abicart, isn't touched.
If you only want to stop the sync for a while, pausing the store is the better choice.