Create shipment and the Shipments list
Under Shipments you find every label the store has booked. It is also where you book parcels that aren't an order's: a replacement, a sample or a parcel to a business.
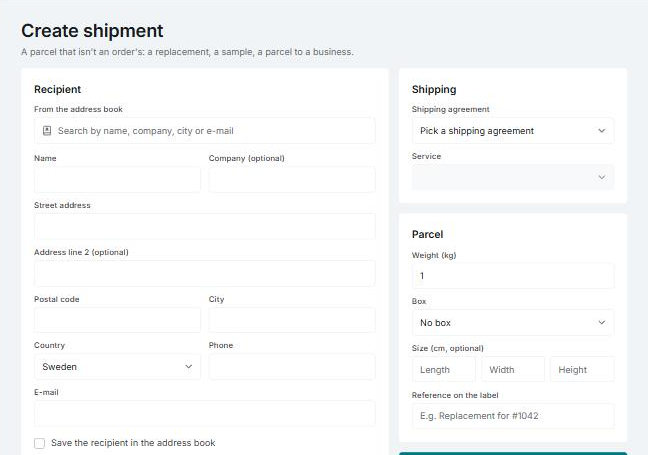
Create a shipment on its own
You need an active shipping agreement. Without one, the page shows Nothing to book with yet.
- Open Shipments › Create shipment, or click Create shipment at the top of the Shipments page.
- Fill in the Recipient: name, street address, postal code and city are required. You can also search for a saved recipient under From the address book.
- Under Shipping, choose the Service. If you have several agreements, choose the Shipping agreement first.
- If the service delivers to a pickup point, choose the Pickup point. Enter the recipient's postal code first, and the points near the address are fetched.
- Tick the Add-on services you want, if the service has any.
- Under Parcel, fill in Weight (kg), at most 50 kg. Size is optional. If you choose a Box, the size is filled in for you.
- Write a Reference on the label, such as “Replacement for #1042”. It is required.
- Click Book shipment.
When the shipment is booked, its tracking number is shown and you can print the label at once. Book another starts over with the same parcel details, and See all shipments takes you to the list.
Tick Save the recipient in the address book if you will send to the same recipient again. Read more in Address book.
A shipment on its own is booked with the agreement and service you choose in the form. Shipment templates aren't used here.
The Shipments list
The Shipments page shows both the orders' parcels and those you booked on their own, newest first. The columns are Booked, Tracking number, Carrier, Recipient, Order and Status. A shipment that isn't an order's is marked Booked on its own.
Search and filter
- Search by tracking number, order, customer or reference.
- Status: Booked (preselected), Failed, Cancelled or All statuses.
- Kind: All shipments, Orders' parcels or Booked on their own.
- Carrier: shown when the store has booked with more than one carrier.
What you can do on a row
- Print label: prints the label again. Read more in Printing.
- Track: opens the parcel's tracking at the carrier.
- Cancel: there for shipments booked on their own that are still booked.
Cancel a label
You cancel a shipment booked on its own in the list, with Cancel. You cancel an order's parcel from the order, together with its fulfillment.
What happens at the carrier depends on the carrier, and the dialog says which applies:
- If the carrier can cancel from here, it is asked to, unless it already has the parcel.
- If the carrier can't cancel from here, the shipment is only cancelled in Invdash. Don't put the label on a parcel.
If something doesn't work
- The shipment couldn't be booked. The carrier's own words are shown in the message. Fields the carrier didn't accept are marked in the form.
- The carrier didn't accept the API key. Check the key, and that the shipping agreement is set to the right system (Test or Live).
- The carrier booked the label, but Invdash couldn't save it. The message shows the tracking number. Don't book the same parcel again.
- No pickup points found. Check the recipient's postal code and country.